If you have a blog on blogspot, you have a subdomain of blogspot. You can change this subdomain and set up your own custom domain so visitors can visit your website using your domain. It also marks your own identity. Here’s a step-by-step tutorial on how to set up a custom domain on Blogspot:
Step 1: Register a domain
If you don’t already have a custom domain, you’ll need to register one with a domain registrar of your choice. There are many domain registrars available, such as GoDaddy, Namecheap, and Google Domains. Follow the registrar’s instructions to purchase and register a domain of your choice.
Step 2: Sign in to Blogspot
Go to www.blogger.com and sign in to your Blogspot account using your Google account credentials. If you don’t have a Blogspot account, you can easily create one for free.
Step 3: Access blog settings
Once you’re signed in, you’ll be taken to the Blogger dashboard. Click on the blog you want to set up a custom domain for, or create a new blog if you haven’t already. Then, click on “Settings” in the left-hand menu.
Step 4: Set up custom domain
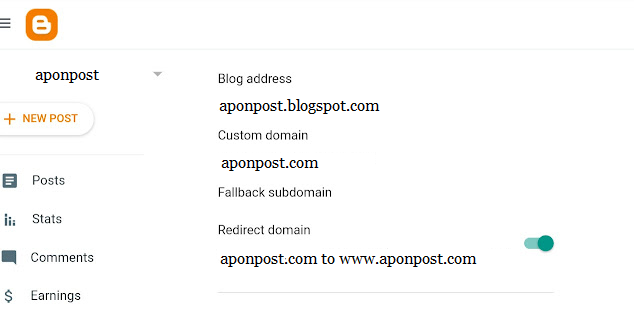
In the “Settings” tab, scroll down to the “Publishing” section. Under the “Blog Address” heading, you’ll see the current domain of your blog, which will be in the format “yourblogname.blogspot.com”. Click on the “Set up a third-party URL for your blog” link.
Step 5: Enter custom domain
In the “Third-party domain settings” window, enter the custom domain you registered in Step 1, including the “www” part. For example, if your custom domain is “www.yourdomain.com”, enter it in the provided field. Then, click the “Save” button.
Step 6: Update DNS settings
After clicking “Save”, you’ll see a pop-up window with instructions on how to update the DNS settings for your custom domain. These instructions may vary depending on your domain registrar, but typically involve adding a CNAME record or A record to point your custom domain to Blogspot’s servers. Follow the instructions carefully and make the necessary changes in your domain registrar’s DNS settings.
Step 7: Verify custom domain
Once you’ve updated the DNS settings, go back to the Blogger dashboard and click on the “Edit” link next to your custom domain under the “Third-party domain settings” section. You’ll need to verify that you own the custom domain by clicking the “Verify” button and following the on-screen instructions. This may involve adding a verification code to your domain’s DNS settings or uploading a verification file to your domain’s root directory.
Step 8: Publish blog with custom domain
Once your custom domain is verified, go back to the “Settings” tab and under the “Publishing” section, select your custom domain from the drop-down menu next to “Custom domain”. Click the “Save” button. Your blog should now be published with your custom domain.

That’s it! You’ve successfully set up a custom domain on Blogspot. Please note that it may take some time for the DNS changes to propagate and for your custom domain to be fully functional. Once your custom domain is active, you can start using it to access your Blogspot blog with your personalized web address.
Let me know if you have any question.