cPanel is one of the most popular platform for hosting management. It is easy to use and it has userfriendly interface. Adding domain on cPanel is very easy. Here’s a step-by-step tutorial on how to add a domain in cPanel:
Step 1: Adding Domain, Log in to Your cPanel
Go to your hosting provider’s website and log in to your cPanel account using your username and password. If you’re not sure how to access cPanel, you can usually find it in your hosting provider’s control panel or by typing “yourdomainname.com/cpanel” in your web browser.
Step 2: Navigate to the “Domains” section
Once you’re logged in to cPanel, look for the “Domains” section, which may be located towards the top or middle of the cPanel dashboard. Click on the “Addon Domains” or “Domains” option, depending on the version of cPanel you’re using.
Step 3: Enter domain details
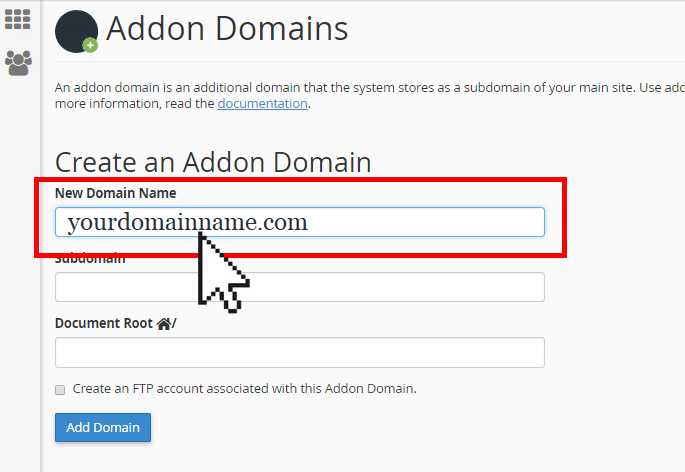
In the “Addon Domains” or “Domains” section, you’ll find a form to add a new domain. Fill in the following details for the domain you want to add:
New Domain: Enter the domain name you want to add without the “www” part.
Subdomain/FTP Username: cPanel will automatically populate this field based on the domain name you entered. You can customize it if you prefer.
Document Root: This is the directory where the files for the domain will be stored. You can leave it as the default, or specify a different directory if needed.
Password: Enter a password for the FTP account associated with the domain. You can use the “Password Generator” option to create a strong password.
Step 4: Click “Add Domain”
Once you’ve entered the domain details, click on the “Add Domain” or “Add” button to add the domain to your cPanel account.
Step 5: Update DNS settings (if necessary)
If you’re adding a domain that is registered with a different registrar and the DNS settings are not already pointing to your hosting provider’s nameservers, you’ll need to update the DNS settings for the domain. This usually involves updating the domain’s nameservers to the ones provided by your hosting provider. You can find the correct nameservers in your hosting provider’s documentation or by contacting their support team.
Step 6: Upload website files (if necessary)
If you’re adding a new domain and you want to host a website on it, you’ll need to upload your website files to the directory specified as the “Document Root” during the domain setup process. You can use an FTP client or the File Manager in cPanel to upload your files.

That’s it! You’ve successfully added a domain in cPanel. Please note that it may take some time for the DNS changes to propagate and for the domain to be fully functional. Once the domain is active, you can start using it to host your website, set up email accounts, and perform other domain-related tasks through cPanel.